http://createeveryday.blogspot.com/2008/01/dishtowel-bib.html
I of course pinned it and then when I sat down to make it found that it was going to be a little difficult. That is because I live in a small town with only a little walmart fabric department and unless I ordered the knit ribbing online or waited until I traveled to a bigger city, I couldn't do it as fast as I was in need for. Plus I am not the greatest at sewing.
I decided that I would just use some old t-shirt colars/necks that I had since one of my other sewing projects is a t-shirt blanket and I would be cutting them off anyway.
So I grabbed a 6 pack of barmop towels from wally-world (cost around 6 dollars).
I wanted the slightly smaller towel (thus why I chose a barmop and not a kitchen towel) and I wanted just plain white. I am trying to keep all my towels and linnens I purchase white so that I can just hot wash and bleach one load rather then trying to seperate darks, lights, etc.
If you want to use an old t-shirt neck, you will need to cut it off from the t-shirt. I cut the t-shirt right along the seam.
Now to make your bib:
1. Cut out a hole in the towel.
I used one of my kids play kitchen plates that was about the size of a DVD.
Because my towel was smaller then a kitchen towel I put the circle about 2 inches from the top, right in the center. (they towel had a crease from how they were folded when purchased and I use that as a middle point of my plate then folded the towel back over to cut.)
2. (follow the picture instructions)
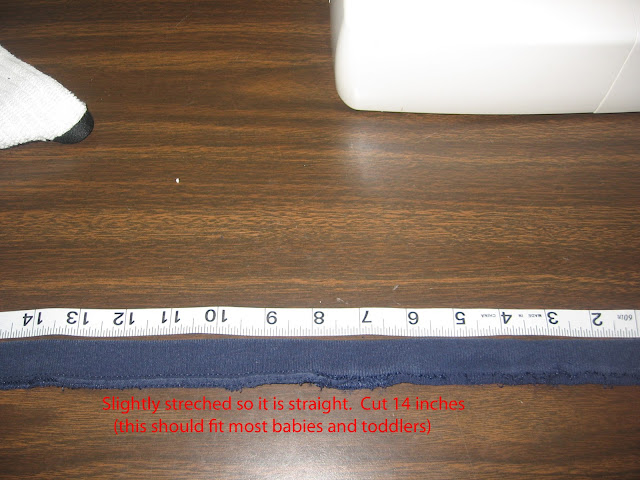
Set aside the towel now the hole is cut, and cut the nick ribbing to the length needed.
3.
I found that some of the neck ribbing was stretchier then others. If it doesn't seem to stretch you may want a little longer, and if it is easy to stretch you might want a little shorter the the 14 inches.
4.
6.
7.
I used a zig-zag stitch (setting of 2 length and 2-3 width) on some and a hem stitch on the others (I wanted to see if one stick held up more then the other). Or you could use a serger if you have one.
9.
10.
11. You are all done!
Here are my bib models.
They were jealous that their little sibling was getting something made, so I let them wear them around the house. Even though I didn't make it for them, the bibs would be good for their size too!
I would say that from start (cutting the t-shirt neck out) to finish it took around an hour to do all 6 bibs.
If you are looking to make one of these bibs, I hope this helps.


I wish more people knew about this blog so they could benefit from them. Everyone you do is so great. I know I don't comment enough (I usually don't get it to post successfully. I guess I don't know how to do it.)
ReplyDeleteLove you lots, Mom
Thank you sooooo much:) These are actual instructions I can follow. Cannot wait to make some.
ReplyDeleteErin-
DeleteGlad you thought the instructions were understandable. Enjoy making and let me know if you have questions. I love how easy they wash.
I love this - my mom has a bunch of these from when my sister and I were babies, and I've found they are SO much more useful! The normal bibs we have from the store do nothing except protect a small amount of the front of his shirt - and all the food ends up beneath the bib or on his pants! I made a quick version for a road trip by just cutting a T shaped slit and adding velcro, but I would love to make this more sturdy version instead.
ReplyDeleteI have found that they are quite durable, and I really like that there is no velcro to snag on other items in the wash. If you make them let me know how it goes :)
Delete