Lately my motivation for certain things has been minimal. I seem to get them done, but kind of last minute. At the end of the day I am finding myself wondering how or why I didn't get more accomplished. I know that some days it is because I spent time doing things with my kids (which can never be wrong) like taking them to the park, playing outside, etc., but other times I feel like I spent it reading/browsing things relating to my hobby. Maybe this is the hard part with 3, learning to balance things. Or maybe it is because I had 2 months where there were big projects that I had to do and getting them done made me feel accomplished, so now I'm back to the everyday things and so even when I get them done, it's just not anything special.
I guess it is time to try find new motivation for the same old things! Especially because I know that as my kids get older there will be many more outside activities that they will be involved in and that means even less time spent at home.
Thursday, April 19, 2012

Tuesday, April 17, 2012
The Kirby
So the Kirby door to door salesman finally got to my house. I think they stopped once before but I didn't really even give them a chance because it was not a good time. Probably had toys all over and my kids running around still in their PJ's (hopefully and not just their diapers :)
The way it was approached was that I would get the carpet in one room cleaned for free and all I had to do was share my experience with a friend.
Well it was a bit more then that...it was a 2 hour demonstration about the Kirby vacuum and how amazing it is.
I had about and hour to pick up the house from the time the salesman first came and when he returned for the "scheduled appointment" in which they asked that I vacuum before they came back. I of course vacuumed and knowing that when he started the whole sales pitch, right off the bat he had me thinking how dirty my floors still were.
Now don't judge me by the dirt in my floors!

This picture is a view of how they show you the dirt in your carpet. They have this filter thing that they put on the vacuum and then after only 10 seconds or less (sometimes more) of vacuuming an area they pop it off an put on a new filter, kindly laying them back on the floor in a display sort of way.
In the mean time they are also showing and telling you all the reasons you need to have a vacuum this great. Such as reducing allergies, carpet and furniture lasting longer, etc.
They even have you get out your vacuum so they can do the '50 passes' test.
They dump baking soda on the floor then vacuum 50 times over the small area with my vacuum, then they pull out a black filter for the Kirby and vacuum up the rest of the baking soda.

and of course they just set them back on the floor in the same manner so that you can continue to see all the DIRTY filters piling up.
They then pull out the accessories and show you how you can basically clean everything in your house. It can even unclog the kitchen sink!
They even vacuumed a small portion of the bed (again with black filters) claiming that what was on the filter was bed mites and their feces (majorly gross if I didn't think that there was also some of the white sheet fibers in it)
Of course by this point they have already introduced the price of the machine and then dropped it once or twice or even three times.
Finally they get to the shampooing part.

So I did get my floors cleaned after two hours of sitting and listening to the sales pitch.
Luckily I had the excuse that my husband was out of town at a work seminar and that I wouldn't be able to talk to him until that evening.
So despite the great appeal to have my floors really clean and a vacuum that can clean everything, I kept telling them I couldn't make a purchase till I talked to mu husband.
I will admit that I WAS SOLD.
And, had I been someone to make large purchases without consulting my husband or taking time to look up reviews, I would have probably bought.
They (I say they because a "manager" would come by and see how the salesman was doing and then a managers discount onto the already reduced price. Or there was the person on the other end of the phone calls, but I am not sure who that was...the person who was okaying then next step or the next price adjustment.)
So despite the fact the Kirby seems amazing, I don't like that the attachments require a whole setup change to the vacuum.
I am also not a fan of the smell that existed after the shampoo and it took more then the claimed 20 minutes to dry.
I will also say that I didn't expect much of my vacuum. I think I paid $40 dollars for it and that was 3 years ago.
But it does the surface like I expect.
Anyway the next time I went to use it I decided to change the bag. I should have taken a picture because I have never seen a bag so full.
I thought they had a "shut off" mechanism that stopped them before they got so full.
Literally the bag was firm to the touch the entire bag, top and all. The only area not filled with stuff was the part that was attached to the vacuum.
I will say that it did a much better job at vacuuming with a new bag. Probably why the see able filter thing the Kirby does allows full suction for the demo's.
The salesman left probably thinking that he wouldn't hear from me, but once I talked with my husband and he looked online at some prices and also talked to his dad (who bought a used one last year), I called him to tell him we would pass at this time.
Maybe if they come back in a year or two I will have more money in the savings account and a few items paid off and will spend the $$ for the "once in a lifetime" vacuum. Maybe.
Until then I will remember to change the bag in my vacuum a little more often!
Oh, and if you were wondering where my kids were during all this...part of the time they were downstairs playing, part of the time sitting on the couch with me, and part of the time playing outside.
Monday, April 2, 2012
Dish Towel Bib
I originally saw this tutorial for a kitchen towel bib on pintrest and from this site:
http://createeveryday.blogspot.com/2008/01/dishtowel-bib.html
I of course pinned it and then when I sat down to make it found that it was going to be a little difficult. That is because I live in a small town with only a little walmart fabric department and unless I ordered the knit ribbing online or waited until I traveled to a bigger city, I couldn't do it as fast as I was in need for. Plus I am not the greatest at sewing.
I decided that I would just use some old t-shirt colars/necks that I had since one of my other sewing projects is a t-shirt blanket and I would be cutting them off anyway.
So I grabbed a 6 pack of barmop towels from wally-world (cost around 6 dollars).
I wanted the slightly smaller towel (thus why I chose a barmop and not a kitchen towel) and I wanted just plain white. I am trying to keep all my towels and linnens I purchase white so that I can just hot wash and bleach one load rather then trying to seperate darks, lights, etc.
If you want to use an old t-shirt neck, you will need to cut it off from the t-shirt. I cut the t-shirt right along the seam.
1. Cut out a hole in the towel.
I used one of my kids play kitchen plates that was about the size of a DVD.
Because my towel was smaller then a kitchen towel I put the circle about 2 inches from the top, right in the center. (they towel had a crease from how they were folded when purchased and I use that as a middle point of my plate then folded the towel back over to cut.)
2. (follow the picture instructions)


4.

5.

6.

7.

8.

9.

10.

11. You are all done!


http://createeveryday.blogspot.com/2008/01/dishtowel-bib.html
I of course pinned it and then when I sat down to make it found that it was going to be a little difficult. That is because I live in a small town with only a little walmart fabric department and unless I ordered the knit ribbing online or waited until I traveled to a bigger city, I couldn't do it as fast as I was in need for. Plus I am not the greatest at sewing.
I decided that I would just use some old t-shirt colars/necks that I had since one of my other sewing projects is a t-shirt blanket and I would be cutting them off anyway.
So I grabbed a 6 pack of barmop towels from wally-world (cost around 6 dollars).
I wanted the slightly smaller towel (thus why I chose a barmop and not a kitchen towel) and I wanted just plain white. I am trying to keep all my towels and linnens I purchase white so that I can just hot wash and bleach one load rather then trying to seperate darks, lights, etc.
If you want to use an old t-shirt neck, you will need to cut it off from the t-shirt. I cut the t-shirt right along the seam.
Now to make your bib:
1. Cut out a hole in the towel.
I used one of my kids play kitchen plates that was about the size of a DVD.
Because my towel was smaller then a kitchen towel I put the circle about 2 inches from the top, right in the center. (they towel had a crease from how they were folded when purchased and I use that as a middle point of my plate then folded the towel back over to cut.)
2. (follow the picture instructions)

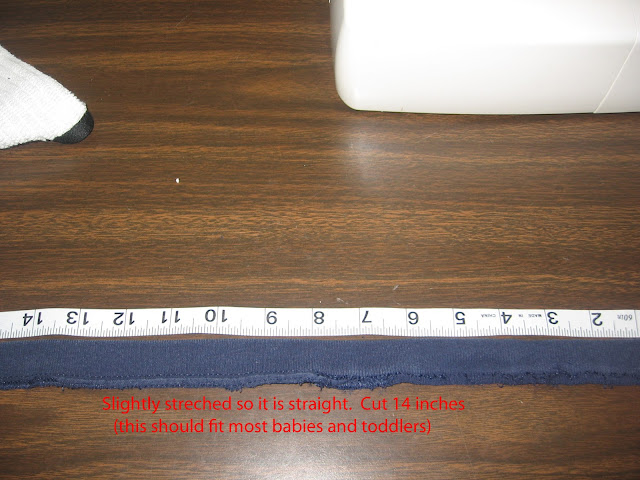
Set aside the towel now the hole is cut, and cut the nick ribbing to the length needed.
3.


I found that some of the neck ribbing was stretchier then others. If it doesn't seem to stretch you may want a little longer, and if it is easy to stretch you might want a little shorter the the 14 inches.
4.


6.

7.

I used a zig-zag stitch (setting of 2 length and 2-3 width) on some and a hem stitch on the others (I wanted to see if one stick held up more then the other). Or you could use a serger if you have one.

9.

10.

11. You are all done!

Here are my bib models.

They were jealous that their little sibling was getting something made, so I let them wear them around the house. Even though I didn't make it for them, the bibs would be good for their size too!
I would say that from start (cutting the t-shirt neck out) to finish it took around an hour to do all 6 bibs.
If you are looking to make one of these bibs, I hope this helps.
Friday, March 30, 2012
A Name
Do you ever look back and feel guilty that you didn't get someones name? Especially when they helped you?
Today the kids and I walked to "downtown" for lunch. The place we picked had a nice outdoor patio where I parked the stroller. While I was getting my wallet out from the diaper bag in the basket I was debating in my head whether to try and leave the kids outside (strapped in the stroller with my oldest in charge to watch the younger) or to just cart them inside. I was leaning toward taking them inside when an older lady who was sitting outside said that she would stay outside with them.
She kindly moved her chair over then jumped right into asking the kids questions, I'm betting she has grand kids!
At this point I went right in without kids (reminder that I live in a small town and ''Downtown" is 4 square blocks and I could walk there from my house in 20 minutes.)
I was able to get everything ordered and carried out without having to try and balance a stroller, a crying child, wandering little fingers, and the food. IT WAS GREAT!
Once I got outside she talked to me just a little bit as she got her stuff together then excused herself, saying goodbye by name to my kids.
I did tell her thank you, but as she was walking away (especially when she addressed my son by name) the thought that I didn't even establish any sort of common ground between her and I, like introducing myself and exchanging names. Was that rude?
Here she did me a great favor and I didn't even get her name.
Again because I live in a small town there is a chance I would see her again, and knowing her name may let her know that because of the small act of service to me, I remembered who she was.
Lesson to learn for next time maybe!
Today the kids and I walked to "downtown" for lunch. The place we picked had a nice outdoor patio where I parked the stroller. While I was getting my wallet out from the diaper bag in the basket I was debating in my head whether to try and leave the kids outside (strapped in the stroller with my oldest in charge to watch the younger) or to just cart them inside. I was leaning toward taking them inside when an older lady who was sitting outside said that she would stay outside with them.
She kindly moved her chair over then jumped right into asking the kids questions, I'm betting she has grand kids!
At this point I went right in without kids (reminder that I live in a small town and ''Downtown" is 4 square blocks and I could walk there from my house in 20 minutes.)
I was able to get everything ordered and carried out without having to try and balance a stroller, a crying child, wandering little fingers, and the food. IT WAS GREAT!
Once I got outside she talked to me just a little bit as she got her stuff together then excused herself, saying goodbye by name to my kids.
I did tell her thank you, but as she was walking away (especially when she addressed my son by name) the thought that I didn't even establish any sort of common ground between her and I, like introducing myself and exchanging names. Was that rude?
Here she did me a great favor and I didn't even get her name.
Again because I live in a small town there is a chance I would see her again, and knowing her name may let her know that because of the small act of service to me, I remembered who she was.
Lesson to learn for next time maybe!
Thursday, March 1, 2012
Still Learning

But my learning tip that is greatest from this event is that NEVER think that kids are not old enough to do something. It they want or ask...LET them TRY.
If they can't, help them or show them, then next time let them TRY AGAIN...and maybe again and again as long as they want to.
It is HARD to do this. It is much easier, faster, ans cleaner if I just do it. I just have to remind myself again and again that being a mother/parent is being a teacher and letting them LEARN. I'm sure as they get older some of their "learning experiences" will come with far greater consequences then a mess on the kitchen floor.
Wednesday, February 15, 2012
Safety Can Opener-Product review
So my can opener broke. It just was spinning without cutting so I knew it was time to buy a new one. I walked down the kitchen tool isle of my local Walmart (since that is really the only store in my little town) and looked at the 4 choices I had. In a way I am glad that I didn't have more options because it was regular can opener, ranging from really cheap to a little more expensive, or I could choose the new "safety" can opener for somewhere around $9.
I was nervous about choosing the safety can opener because what if I didn't like it. Then I would be mad that I didn't just put the $9 toward the nicer regular can opener.
After contemplating my purchase (which I really did for at least 2 minutes or more...who knew that a can opener would cause me to stand in the store with my kids in the cart, probably whining because we were stopped to long!) I bought the safety can opener.

And I would have to say that I am glad I did. Since I like it I thought that I would put my consumer review out there for anyone else who has had the same debate.
Why I love it:
*It is quite easy to use. It was a little difficult the first time to figure it out but now it is so much easier then a regular one. The instructions were a must the first time using it.
*It basically just takes the top off the can in a reverse manner that it was originally put on. If you have ever canned before you will understand this. That means there are no sharp/cutting edges!
*Because the top as been cleanly removed when you use a rubber spatula to scrape out the insides, you do not cut your spatula with the little lip that old can openers leave.
*My almost 4 year old can use it where the old can openers he couldn't.
*The lid can't fall into the can. This is a bonus because I sometimes forget to wipe the dust off my cans and this way the juice doesn't start to come out before I take the lid off.
*There is nothing sharp on the can opener
Negatives:
It is a little harder to drain the liquid. I used to open the can all but just a little piece and just slightly press it in the can to drain. But now I just have to slide the lid off to the side a bit. So it is a very minor negative.
Monday, January 30, 2012
DIY Fabric Bag
Since I grew up trick or treating with a pillowcase, I thought it would be fitting to modify a pillowcase tutorial in helping me to make trick or treat bags for my kids this past Halloween. (yes I am way behind on posting this tutorial.) I took one of their library bags to get the size and bottom panel. This is my first time doing a do-it-yourself tutorial. So if you want to make a bag and have questions on anything, just ask :)
You will need 3 different coordinating fabrics:
For the Main Bag Fabric you will need:
1- 11" x 28" piece,
1- 3" x 11 3/4" panel (this will be the bottom piece)
Hem
1- 5" x 28" piece
Trim
1- 1 1/2" x 28" piece
Straps (using one of the 3 fabrics from the main, hem, or trim)
2- 3" x 20"


You will need 3 different coordinating fabrics:
For the Main Bag Fabric you will need:
1- 11" x 28" piece,
1- 3" x 11 3/4" panel (this will be the bottom piece)
Hem
1- 5" x 28" piece
Trim
1- 1 1/2" x 28" piece
Straps (using one of the 3 fabrics from the main, hem, or trim)
2- 3" x 20"

The trick-or-treat fabric is my main (also bottom panel and straps)
The Black boo is the Hem
and the orange is the trim.
Now to sew:
-Fold the trim in half lengthwise right side out and press
-lay hem fabric right side up along the top
-lay main fabric wrong side up with other fabric tops-then roll up starting from bottom until the roll is shorter then the hem (pictured below with the tops on the left)

Fold the hem fabric over the rolled up main fabric and pin (pictured below)

-Sew along the raw edges, leaving a 1/4'' to 1/2'' space.
-Turn tube right side out
-Press (you can also sew the trim flat against the main fabric)

-With wrong side out fold in half and sew the raw edges with zig-zag (this is the side of the bag)
-Pin in bottom panel starting from short side and with the main bag seam in the middle of the bottom panel, and sew with zig-zag. (the panel is optional you can just sew the bottom of the bag like the side and it will be more like a pillowcase)

Your main bag should be completed at this point.
For the straps:
-fold in lengthwise, right side in, and sew.
-Turn right side out
-Press so seam is in the middle (optional)
-tuck 1/2'' to 3/4'' of each end back inside tube (creating a hem) and press
-sew one end of strap onto one side of the main bag 4" from one side and the opposite end 4" from the other side
-repeat for other strap and side
I used a 1" square with diagonal (pictured below)

YOU ARE DONE!

You can add pockets and have a great little all purpose bag.
It was easy enough that I might make some more!
Subscribe to:
Posts (Atom)